Black Velvet Canyon
Frogland (5.8) - Six Pitches - Trad - Mixed Anchors
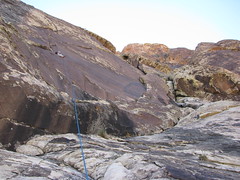
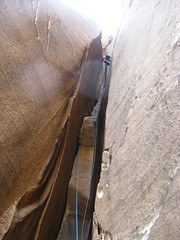
 Approach: Walk along the road until it curves left. Go straight on the obvious path and follow that for about 15 minutes. Look for a cairn and a path that heads off left. Take that trail and all of its switch backs to the base of Whiskey Peak, heading right to the start of the climb. Frogland starts on a fallen, hollow, sketchy-looking pock-marked block.
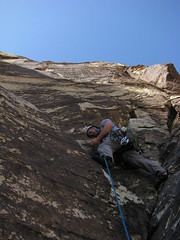
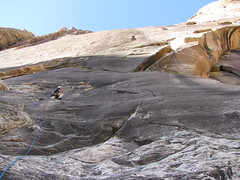
Pitch Two (5.7) - Tree Anchor - 140 Feet: Walk up right along a ramp and follow the corner and crack on the left to another nice belay ledge. This ledge will have very low roof that will likely require you to sit down or crawl around. There is webbing / cordallette wrapped around a tree up high.
Pitch Three (5.6) - Gear Anchor - 120 Feet: Step left and make a high-step onto the face left of the tree. Follow the path of least resistance a left-facing corner with thin face moves on the left. Some people climb the face, then traverse left to the left-facing corner and some climb the right-facing corner below that. (sorry, no pic for this pitch)


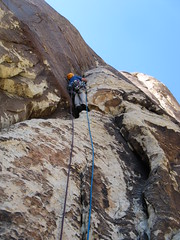
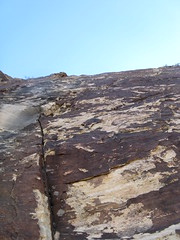
Pitch Five (5.8) - Gear Anchor - 140 Feet: Climb straight up to a bolt, then fade left on cracks to a large chockstone and tunnel underneath that (optional belay). Step right to obvious jugs on the right under a bulge. Make the awkward move out right to clear the bulge and belay from here.
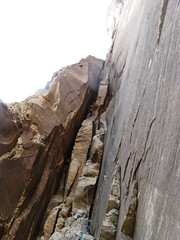
Pitch Six (5.6) - Gear Anchor - 165 Feet: Move up the dirty gully about 25 feet using the corner on the left (but fade up the easy terrain on the right). Then find delicate ledges (they look as if they may fall off if you pull on them) on the face to the right. Climb this delicate section to the overhang (very likely runout for about 35 feet). Step over the overhang and find the path of least resistance to the top. (sorry, no pic for this pitch)
Descent: Walk off to the left and follow the cairns to the gully. The gulley heads down to the left. Find the trail that continues back to the left (toward the front of Whiskey Peak). If you brought your gear up with you, then find the cairn that marks the trail down and go that way. If you left your gear at the base, then continue past that trail for about two minutes until it curves back left to the start of the climb.
The Gobbler to Dream of Wild Turkeys (5.10a) - 10 pitches - Trad - Bolted Anchors
Pitch One (5.9) - Sport - Bolted Anchor - 100 Feet: Follow the bolts up left before traversing right along the ledges. Then following the underclings back left to the anchor.


Pitch Three (5.10a) - Sport - Bolted Anchor - 75 Feet: Follow the bolted line on the left (I made the mistake of following the nice line of bolts to the right, so kind of ignore this beta pic) straight up to the anchors that make the start of P4 of Dream of Wild Turkeys.
Descent from The Gobbler: Rappel with two 60m ropes using the bolted anchors below you. Beware that the offwidth on P2 may eat your rope.
- OR -

Pitch Five (5.9+) - Sport - Bolted Anchors - 60 Feet: Fade left on the crimpy slab to the base of a corner. We combined pitch five and six, so the photo is for both pitches.
Pitch Six (5.9) - Trad - Bolted Anchors - 140 Feet: Fade right on a ramp. When at the top of the ramp, fade back left into the corner and climb this to the anchors above the corner.
Pitch Seven (5.9) - Trad - Bolted Anchors - 110 Feet: Climb the crack until it ends, then climb the face up to a comfortable ledge below a right-fading 4th class section of rock. While many people rappel from here, it is worth continueing to the top.
Pitch Eight (4th class) - Trad - Bolted Anchors - 80 Feet: The start of ninth pitch is pretty much directly above the anchors at the top of the seventh pitch. Climb up right on the ramp until it is easy to step back left to a bolted anchor below an unlikely 5.9, shallow corner.
Pitch Nine (5.9) - Trad - Bolted Anchors - 140 Feet: Climb just left of the shallow corner, then step right on the path of least resistance (clip the bolt), then follow the right-facing corner to a ledge with bolts.

Pitch Ten (5.9) - Trad - Bolted Anchors - 150 Feet: Climb up the face past four bolts, then move left into a crack. Follow the crack all the way to the top. (photo taken from the top)
Descent: Rap station-to-station all the way to the ground (requires several raps and will take a while). One note: many people, when they get back to the base of the 4th class pitch, rappel down to the left on Prince of Darkness. This has hanging belays all the way to the bottom, as does Dream of Wild Turkeys, but people have had problems with their rope getting stuck in the crack down low on the DoWT rappel, whereas there is no crack on PoD. We rapped on PoD, but the other party that was climbing with us rapped on DoWT. Neither of us had a problem getting our ropes down.
Epinephrine (5.9 IV) - Trad - Ten Pitches (pitches can be broken up more at many intermediate anchors) - Mixed Anchors
 Approach: From the parking lot, follow the road toward the canyon, staying straight on the obvious path when the road narrows and heads up and left. There will be a couple of paths that head down into the wash (the second is supposedly easier), take one of them and follow the wash through the boulder field until it is walled in (there may be a small pool where it ends). Find a path on the left and follow that when it winds rights toward white rock and hard 4th class / easy 5th class scrambling. Scramble to the top. Then find the path that heads directly down and to the right. This leads back into the wash on the other side of the massive boulder that initially blocked your way. Head up the wash some more until you come to a pock-marked face that is pretty much directly beneath the chimneys. There will be two sets of bolts; the easier and most often-taken line is to the left and pretty much starts at a tree.
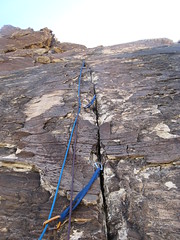
Pitch One (5.8) - Trad - Bolted Anchors - 165 Feet: Climb up the bolts to a bushy ledge. Climb up the corner and fade left across the slab to an arching right-facing corner. Climb that to a small ledge with bolts.


Pitch Six (5.7) - Trad - Bolted Anchors - 200 Feet (can be barely done with a 60m rope. Otherwise stop at the bottom of the Elephant's Trunk): Climb the face above the bolts and fade left toward the ledge with the overhang. Climb the overhang and move right on easy terrain toward the Elephant's Trunk (optional belay if you don't think your rope will make it). Climb the face of the Elephant's Trunk to a bolted belay.

Pitch Eight (5.7) Trad - Bolted Anchors - 170 Feet: Climb the long corner system all the way up to bolted anchors (beneath a couple off roofs).

Pitch Nine (5.8) - Trad - Gear Anchor - 165 Feet: Climb the corner up to a bulge. Clear the bulge on the right, then traverse easily left under the roof and find two bolts (one with a hanger and one without). Belay here.
 Pitch Ten (5.7) - Trad - Gear Anchor - 150 - 200 Feet: Head left to the corner and climb that all the way up until you find two bolts that are missing hangers. Belay here if you want, or continue up and find your own adventure on the ramp until you find a decent place to build an anchor.
Remainder (4th class with one airy 5.4 move): Probably best to simul climb or unrope and walk up the next 300-400 feet. Once at the top of this ramp, however, you may want to rope up again, even if just to simul climb, because the traverse is thin and airy, and the 5.4 move, which is in the middle of what equates to an arching traverse, may freak some people out (blow it and you're going for 1500 feet all the way down to the wash). At the top of the traverse, it is safe to unrope again. Follow very easy rock that switches back a few times until you get to the slab on the other side of the cliff.
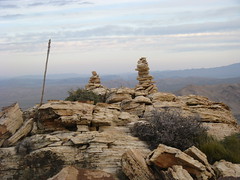
Now then, see that dome up and to your right that is much higher than where you're standing? You've got to go over that. So head up and right on easiest trail (be careful not to get too close to the edge). Once on top (true summit of Black Velvet Peak), head left and follow the ridge up and down several false peaks for about 40 minutes until you get to either two very large cairns or a bunch of cairns sitting next to each other. There will be cairns along the way, but they will not be easy to see sometimes. BE CAREFUL NOT TO HEAD DOWN TOO EARLY.
At the two large cairns, begin the long, winding, well-cairned trail down to the saddle between Black Velvet Peak and Whiskey Peak (top of Frogland). Once in the saddle, follow the trail down to the right until it flattens out and heads left (toward the front of Whiskey Peak). Look for a cairn that marks a trail that heads back down to the right and follow that to the car. If you miss this last cairn, no worries, it will only be a couple of minutes before you realize that you're at the start of Frogland, and the walk from there isn't hard either.

No comments:
Post a Comment