Near Trapps
Approach: Take the path just after the Route 44/55 road sign as one walks downhill away from the Near Trapps Bridge. Routes noted below are arranged according to grade (easiest to hardest) and each has it's own approach directions.
Approach: Walk down the Near Trapps path for about seven minutes, passing Birdcage, to the left-facing corner capped by a small, triangular overhang about 20 feet off the ground. There is a left-angling section of rock near the ground just to the right of the corner.
Pitch One (5.6) - 70 feet - Tree anchor: Climb the dihedral to the top and step right to the left-facing corner and climb that. Then step right and climb the face to the tree ledge.
Pitch Two (5.6) - 110 feet - Tree anchor: Start right of the ledge, and go up right to a blocky, left-facing corner. Stay straight up until you come to a blocky overhang (can't see this from the belay). Exit left to the ledge above.
Descent: Rap to the ground with two 60m ropes or twice using one 60m rope and the tree rap station at the top of the first pitch.
Te Dum (5.7) - Two pitches - Trad - Gear / Tree anchors:
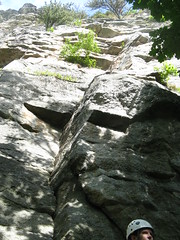
Approach: Near the beginning of the Near Trapps, find the open book with an offwidth on the left face and left-facing flakes above the overhang on the right face. The corner is capped by a large roof.
Pitch One (5.7) - 105 feet - Trad - Gear anchor (recommended): The Williams guidebook suggests starting on the offwidth to the left, but this seems contrived. The direct start in the corner on the right, which is often wet (which may be the reason the guidebook suggests climbing the offwidth) is not only more direct, but it doesn't change the grade any. It also makes for really nice climbing.
Climb the corner to the left-facing flakes. Then follow the path of least resistance to the top. Choose between traversing low or high around the corner (both are awkward and require different styles) and build an anchor in the new dihedral.
Pitch Two (5.4) - 50 feet - Trad - Tree anchor: Fade up right and exit the roof on the right to the top. (sorry, I forgot to take a picture of this pitch)
Descent: Walk left about 100 feet to a thin path that leads left toward the edge. Find a tree with slings attached and make the rap over Alphonse to the ground easily with two 60m ropes and with rope stretch with one 60m rope (shorter / lighter people may have to hop off the ends of the rope about a foot with one 60m rope).
Approach: This route is a long left-facing corner that traverses under a large, triangular roof near the top. There is a small, squarish roof about two square feet in size just to the left of a small tree growing out of the rock about 20 feet up.
Pitch One (5.8): This route can be broken up into two pitches, and many people, particularly those with a single rope and a lack of long slings, will build a semi-hanging belay about 10 feet below the crux. If done this way, then the first pitch is 5.6. However, this is a pain in the butt, so I recommend doing it with either really long slings (multiple four-footers for the traverse under the roof) or two 60m ropes with maybe only one four-foot sling used.
Climb the dihedral to the bulge and clear that, stepping right into the corner afterward. Climb the corner to the roof above, traversing left on the easiest terrain (I went right up to the roof with my hands) to a nice ledge to rest on (just left of the crux). Climb straight up so that you're just barely left of the notch, step right using good-but-somewhat-hidden holds in the notch, and pull through the notch. Traverse right to exit to the tree ledge above.
Descent: While it is possible to rap off this route with a 60m rope, be aware that you'll only get to the ground with rope stretch. Shorter people will probably require a small jump (a foot or so) at the end of the rope. Therefore, it is recommended to either use a 70m or two 60m ropes.

Approach: Walk about 20min from the Route 44/55 side where the path begins to a massive boulder leaning against the cliff. The boulder will have a crack going up the outer edge and a large "cave" about two-thirds of the way up where the boulder rests against the cliff. Main Line is the short, right-facing corner just left of a low roof that turns the into a left-facing corner about 10 feet up. This is about 40 feet before the massive boulder (to the right if facing the cliff).

Pitch One (5.7) - 100 feet - Bolted anchor: Starting on the right-facing corner below the low roof, make two moves up, step left around the arrete onto the face, and climb straight up the left-facing corner above. Step right and climb the left-facing corner to the thin-looking half-moon corner. Top out and walk about 15 feet right to the bolted anchors.
Pitch Two (5.8) - 55 feet - Tree anchor: Climb straight up and fade right so that you're just right of the obvious notch above. Step left into the notch, pull it, and exit right to the ledge above.
Descent: Rap once from the top with two 60m ropes or rap twice with one 60m rope.
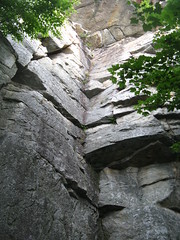
Approach: Find the dihedral with two cracks in it. The dihedral is capped by a roof, and there is an obvious traverse out left to a nose / arrete. Some people combine pitches one and two, or two and three, or do this all in one pitch with good rope management. I found combining pitches one and two to be the easiest option.
Pitch One (5.6) - 50 feet - Trad - Gear anchor: Climb the corner / crack to the roof (stepping right near the top to gain the upper hand traverse under the roof before going left), then traverse straight left out to the nose. Use a #1 and #.75 Camalot for anchor pieces. These pieces won't be needed much (if at all) on the next pitch.
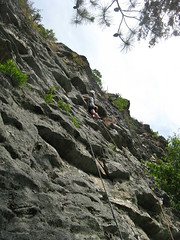
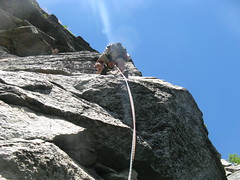 Pitch Two 95.90 - 110 feet - Trad - Tree anchor: Step left around the arrete and climb the thin face up to the horizontal crack about 20 feet above the anchor (it might be best to clip the anchor as your first piece). Make the easier-than-it-looks step right around the arrete, fade up and right on thin holds (crux) before heading straight up on easier ground to the obvious roof above. Taller people will be able to grab the intermediate hold above the roof from the ledge. Shorter people may need to make an awkward and committing (but again, it's easier than it looks) step out right to gain the hold. Finish up right on the ledge above. The pitch actually starts much to the left of the climber's position in the photo.
Descent: Walk left about 40 feet to a small path leading left toward the edge. Rappel easily with two 60m ropes to the ground or with rope stretch with one 60m rope. Shorter / lighter climbers may have to make a small one-foot hop off the ends of the rope with a single 60m rope.

Approach: Near the beginning of the Near Trapps, find a slick block with a small overhang in it about 8 feet up. There is a large roof to the left and the right-facing corner above the block is also capped by an overhang.
Pitch One (5.9+ R) - 75 feet - Gear anchor: Those who know the guidebook will cringe at my grade. The Williams guidebook lists this as 5.8, but the first few moves are definitely no longer 5.8. In fact, the feet are so slick and the landing so uneven that I've even added an R-rating to the climb. If the leader blows this opening sequence then the chances of getting hurt are pretty high, even from only five feet above the ground. I say this knowing a belayor who broke her wrist spotting a fallen leader because the ground is so uneven and unforgiving at the start.
Make the bouldery moves up to the ledge about 15 feet off the ground, step left around the arrete below the overhang and pull the overhang to the next overhang. Step right and move up and back left to a nice belay ledge. It is much easier and more comfortable to belay from this ledge than from the hanging tat anchor about 10 feet up.

Pitch Two (5.8) - 70 feet - Tree anchor: Starting in the corner, move up toward the hanging anchor. Make several very thin moves right until it is obvious one can move upward (about a 12-foot traverse on thin gear). Climb up to the roof and make the easier-than-it-looks traverse left back to the corner under the S-shaped groove. Head up the groove and to the top. The initial traverse could also be considered R-rated due to the thin gear and the unfortunate swing that could result in a fall. The second traverse is well protected at the start, however.
Descent: Most people walk off to the right along the path and scramble back down to the Near Trapps path below. Alternatively, one can rappel on the Alphonse rap station about 150 to the left (see Alphonse above for important info on this rap).
 Criss Cross Direct (5.10a) - One pitch - 60 feet - Fixed gear anchor:
 Approach: Near the beginning of the Near Trapps, find a short-but-deep right-facing corner capped by an overhang that is about seven feet off the ground. There is a crack that separates the bulging overhang from the corner.
Pitch One (5.10a) - 60 feet: This route has two pitches, but many people only do the first pitch. I don't have any info on the second pitch at this time.
Jam / layback / grunt through the overhanging crack to a slick stance above. Make the delicate moves up through the next overhang to easier ground. Climb straight up to the fixed anchors above.
Descent: Rap from the fixed anchor above. If going to the top, then walk off right (see Broken Sling descent above).

Approach: Walk for a few minutes along the Near Trapps path until you come to a massive dihedral capped by a triangular roof. The beautiful face to the right is Birdland (5.8) and the dihedral and roof to the left are Birdcage. You will walk slightly uphill from a shady section of rock just before the start of the climb.
Pitch One (5.10 b) - 110 feet: Stem the dihedral to near the top, protecting the far left corner with at least a six-foot sling. Make the delicate traverse right (crux) to below the notch in the roof. Grab the jug above, step left into the upper corner, and thrash up to the upper jugs to a scrunched stance. Make the easy step out right to clear the upper overhang and climb straight up to the fixed anchor.
Descent: A 60m rope will get you down just fine. In fact, many people top rope this with a 60m rope.
Approach: To the right of the large, A3 roof with fixed gear is a prow that is called Muriel's Nose (5.10a). To the right of the nose is a gully with a tree and a five-foot tall block behind the tree. You should see the prow slightly to your left if standing at the tree. This route is about as far down the Near Trapps as you can go. Expect a 20-30min walk and complete peace and quiet.
Pitch One (5.10c) - 100 feet: Starting on the right of Muriel's Nose, climb up the slab to a bushy corner that is right of a left-moving traverse (which is Hold the Mayo (5.9), which goes left of the nose). Climb straight up the corner and exit left at the overhang. Climb the thin face / crack (crux) to a nice stance. Then either climb the corner straight up to the right or traverse left back toward the arrete for a 5.9 finish. There are two ways to do the 5.9 finish: 1) use your hands on the lowest ledge and dangle out to the bottom of the nose or; 2) use the lowest ledge for feet and battle the slopey-but-good-enough hands and fade up left to the arrete. Both are about the same grade, but the second option is less pumpy and more technical than the first.
Descent: Walk off left to the end of the cliff. It should take less than 5min to get back to the start.

No comments:
Post a Comment