Click here for all Guidebook posts
Click here to return to the Moab Route Index
Wyrick-Merrill (C1 5.8 III)
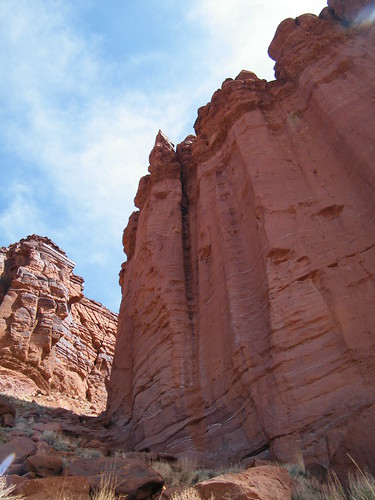
- Approach: From Moab, drive out on Route 128 (River Road) toward the Hittle Bottom campground area. After the turn-off toward the Fishers, and before Hittle Bottom (near mile marker 22), find the yellow bar blocking vehicles from driving off-road. Hike toward the towers that are directly ahead, keeping the long mound of dirt to your right. A path will emerge that will lead to a Juniper Tree. There is another, more obvious, initial path that fades to the left, and that path works, too.
Approach not taking initial path: Walk across country until you come across the obvious path (not initially seen from the road). This is best done by walking parallel to the mound of dirt to your right. Follow the path to the Juniper Tree, and then follow it again until the mound of dirt begins to meet where the cliffs begin. Scramble up the mound of dirt, and follow the path of least resistance (requires some climbing) up left, keeping River Tower to your left. Once above the highest layer of cliffs that are below the tower, hike up the steep, loose terrain, Keeping River Tower to your left. Walk all the way to the end of the tower, and come back down on the other side.
Approach taking initial path: Follow the obvious path from the road as it leads to the left. When it meets the cliffs, scramble up as high as you can and carefully traverse right toward River Tower. There may be a fair amount of smaller bouldering moves / climbing sections required to get up high enough to be on the same level as the start of the climb. This may be quicker than the other directions, but it is less straight forward and may be longer if you don't put the pieces together correctly the first time.
The start of the route is at the edge of a small drop-off (about 15 feet) and there is a bolt to the left of the chimney. It is about mid-way down the tower.
General NotesThis route requires two ropes for the final
 pitch. It is preferable to have two 60m ropes in order to rap in one go off the third pitch anchors.
Pitch One (C1) - Aid - 130 feet - Old bolts / piton anchor: Start on the first good bolt and swing out right into the chimney. Aid up the old bolts (most are 1/4" with wing nuts) on very loose and dirty terrain. The belayor is best standing well off to the left as a result of the fragile mud. The bolts end about 15 feet below the anchors. Aid the crack on the right to the anchor.
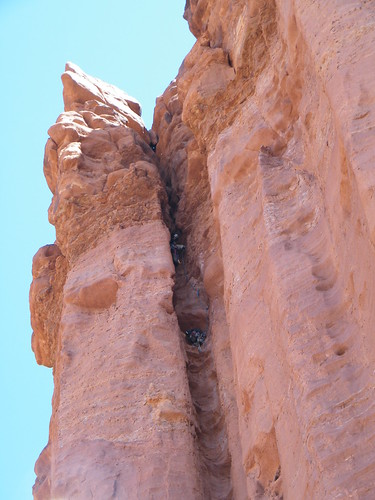 Pitch Two (5.4 R C1) - Mix of aid and trad - 80 feet - Gear anchor (slings may be needed): Carefully aid over the roof above the first pitch anchors. Follow the chimney straight until the climbing becomes easier and the rock more stable near the top (less aid and more free climbing). Belay at the notch where the boulder creates a window down into the chimney at a ledge. Slings may be needed to thread the notch on the boulder.
Pitch Three (5.3 / 4th class scramble) - Trad - 50 feet - Bolted anchor: Climb the easy climbing directly above the ledge to a larger ledge. Walk right, to where the ledge seems to end. Make a sketchy and unprotected step around the corner and across the empty space where two ledges seemingly meet. The bolts are directly across on the right. Fix your rope here for the rap / Tyrolean traverse to the summit. Scramble up above the bolts and walk about 25 feet to where the notch separates the false summit from the real summit. Rap down into the notch.
Pitch Four (5.8) - Trad - 50 feet - Bolted anchor:
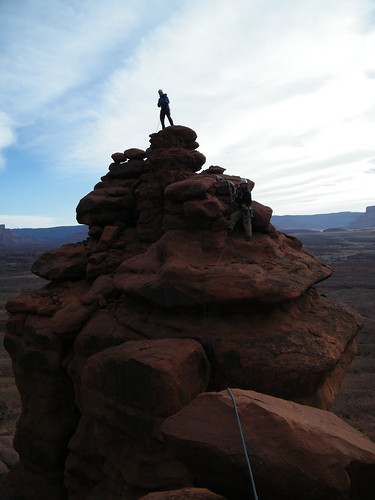 Climb up the first 10 feet to where the free standing flake begins. With the summit in front (and the third pitch behind you), move left into the flake to the other side (your belayor won't be able to see you for a bit) and climb straight up. After exiting the flake, walk right toward the anchor (directly above where the climb initially started). You'll be on the summit section of the tower, but below the actual summit. The actual summit can be gained as a sort of fifth pitch from this point.
Descent: Either set up a Tyrolean traverse with the rope that is fixed on the third-pitch anchors and scale across the notch, or rap off the fourth pitch anchors into the notch and then jug up the rope fixed on the third pitch bolts. From there, two 60m ropes is enough to rap back to the first bolt. Make sure that you tie knots in the ends. The rap may require a swing to the left to gain the ledge where the first bolt is. Otherwise, you'll end up about 15 feet short Two 60m ropes just barely makes it back to the bolts (by about 5 feet or so).
Walk up to the top of the hill and walk down the other side of the tower for the walk back to the car.

No comments:
Post a Comment